Using Docker for Windows to Create a Sphinx Documentation Build Environment
At work we use Sphinx to create html based documentation for some of our applications. Setting up a new machine to build the documentation requires installing Chocolatey, Python, Sphinx, the Read the Docs Theme, and Node. While not too complex small differences in individual machines can result in broken builds.
I’m already familiar with creating virtual machines to create isolated development environments – Packer and Vagrant are your friends – but a virtual machine just for generating help documentation seems like a pretty heavy handed solution.
I’ve read that Docker is used to create small, repeatable, environments (containers) for developing and running applications but I had zero hands on experience with Docker and I wanted to learn more. This describes my how I used Docker to create a development environment suitable for building documentation with Sphinx.
Prerequisites
- Windows 10 with the Anniversary Update
- Chocolatey
- An existing Sphinx project
Installing Docker
The official documentation states
Docker for Windows uses Microsoft Hyper-V for virtualization, and Hyper-V is not compatible with Oracle VirtualBox. Therefore, you cannot run the two solutions simultaneously.
Since I already had VirtualBox installed and didn’t want to uninstall it I I needed a better solution. Fortunately Scott Hanselman already documented how to switch between VirtualBox and Hyper-V. While the instructions are for Windows 8.1 they work just as well with Windows 10.
Once booted into Windows with Hyper-V enabled I installed Docker for Windows with chocolatey.
choco install docker-for-windows -y
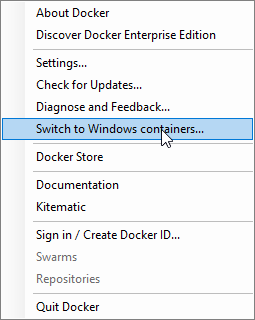
I also wanted to try using Windows containers rather than Linux containers. To
switch container types I started Docker for Windows, right clicked on the Docker
icon notification area and selected Switch to Windows containers....
Installation done!
Creating the Dockerfile
The next step was to create a new Dockerfile to define the image. I created
the Dockerfile in the root of my existing Sphinx project folder, help-doc.
C:\dev
├── help-doc
│   ├── source
│   ├── Dockerfile
│   ├── make.bat
│   ├── makefile
│   ├── README.md
The contents of the Dockerfile are shown below.
# Base the image on Windows Server Core
FROM microsoft/windowsservercore

# Install software to build docs
ENV chocolateyUseWindowsCompression false
RUN powershell Set-ExecutionPolicy Bypass;
RUN powershell -Command iex ((new-object net.webclient).DownloadString('https://chocolatey.org/install.ps1'));
RUN choco install nodejs -y
RUN choco install yarn -y
RUN choco install python3 -y
RUN pip install sphinx
RUN pip install sphinx_rtd_theme

# Map 'C:\src' to 'S:\' and set 'S:\' as the working directory as a workaround for
# Windows Container: fs.realpathSync() is broken on shared volumes
# https://github.com/nodejs/node/issues/8897#issuecomment-319010735
RUN mkdir C:\src
RUN powershell Set-ItemProperty -Path 'HKLM:\SYSTEM\CurrentControlSet\Control\Session Manager\DOS Devices' -Name 'S:' -Value '\??\C:\src' -Type String
WORKDIR 'S:\\'

# Install light-server via package.json
RUN yarn install

# Instruct the container to listen on port 8080
EXPOSE 8080

# Run light-server when running the image
CMD yarn serve
My package.json file (below) is simply used to install and launch light-server
bound on port 8080 from content in the ./build/html directory. ./build/html
is where I have Sphinx place compiled HTML documentation.
{
  "name": "help-docs",
  "version": "1.0.0",
  "author": "Ryan Taylor",
  "description": "Application help docs",
  "scripts": {
    "serve": "light-server -s ./build/html -p 8080"
  },
  "devDependencies": {
    "light-server": "^2.2.1"
  }
}
Building the Image
With the Dockerfile and package.json complete I built my image by running
the following from within the Dockerfile’s directory, naming the image
windowssphinx.
docker build -t windowssphinx .
Running the Image
Running the image is a bit more involved.
docker run -d --rm -p 8080:8080 -v "$(pwd):C:\src" --name docs windowssphinx
-d runs the container in the background. This allows me to continue working in
the same PowerShell window used to invoke this command. --rm automatically
removes the container when the container is shut down. -p 8080:8080 binds port
8080 of the host to port 8080 of the container, later used to view our compiled
documentation via a web browser on the host. -v "$(pwd):C:\src" mounts the
host’s current working directory (C:\dev\help-doc) to the container’s
C:\src directory. With this changes to my source files are reflected
immediately in the container, ready to be recompiled. --name docs gives the
container a friendly name I use in subsequent commands.
Building the Documentation
With my container running and mapped to my source directory, I only need to
execute .\make.bat html on the container to build the documentation. -it
let’s me see the output of the command in my PowerShell window which is useful
for debugging.
docker exec -it docs .\make.bat html
Viewing the Documentation
To view the compiled documentation I first had to obtain the IP address of the container as Docker for Windows does not map ports to localhost.
docker inspect docs
After locating the IP address in the returned JSON array I can view the compiled documentation by launching a browser with that address.
start chrome http://[ipaddress]:8080
If I make a change to the source files I now simply rebuild the documentation with the build steps defined above and refresh my browser!
Stopping the Container
When I’m done with my changes I stop the container with the following.
docker stop docs
